How to Use Safety Light Curtains?
- Share
- publisher
- Vicky
- Issue Time
- Aug 27,2024
Summary
Learn how to use safety light curtains with step-by-step guidance on installation, alignment, configuration, testing, and maintenance for industrial machine safety.
The use of safety light curtains requires installation, configuration, and maintenance in accordance with the correct steps to ensure their effectiveness and safety. The following are the steps and precautions for using safety light curtains:
Preparation for Installing the Safety Light Curtain
Selection and planning
Choose the appropriate safety light curtain model according to the specific needs of the workplace. Factors to consider include the size of the protection area, the number and spacing of light beams, reaction speed, and environmental conditions (such as temperature, humidity, vibration, etc.).
Determine the installation location
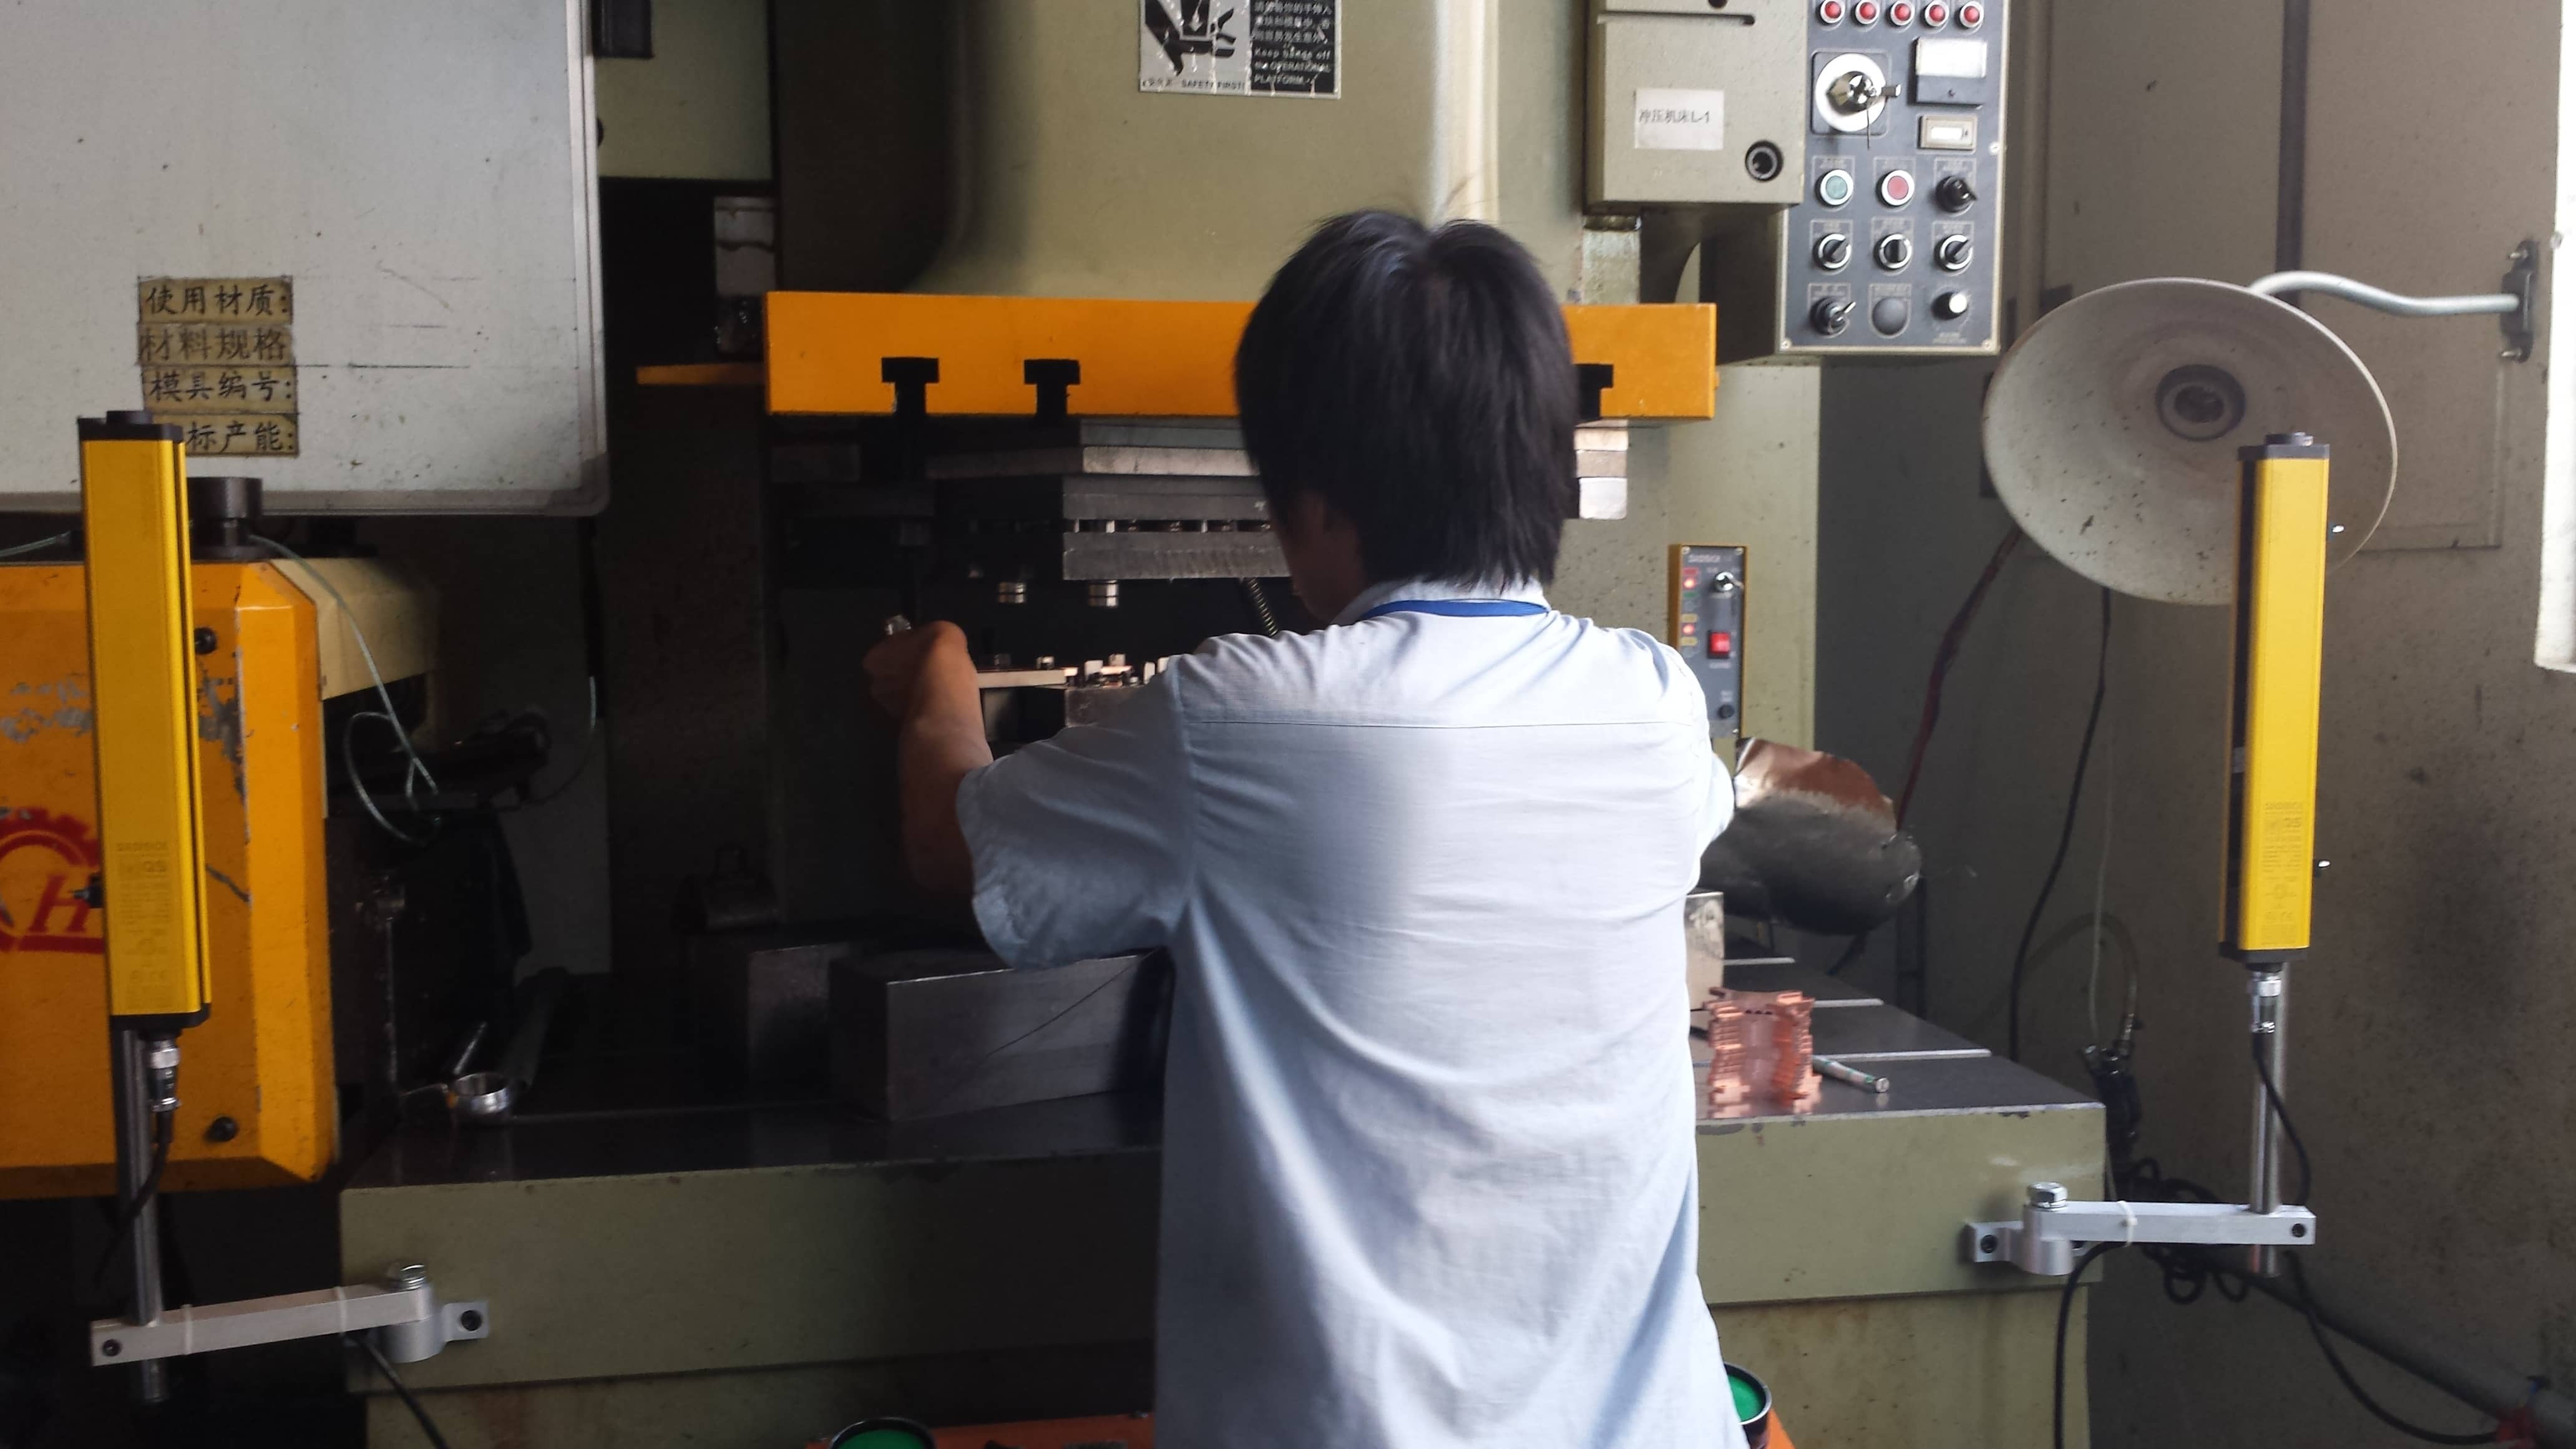
Determine the best installation location for the safety light curtain based on the range of activities of equipment and personnel. Generally, the safety light curtain should be installed at the entrance of the hazardous area to be protected to ensure that any person or object entering the area will be detected by the safety light curtain.
Safety Light Curtain Installation Process
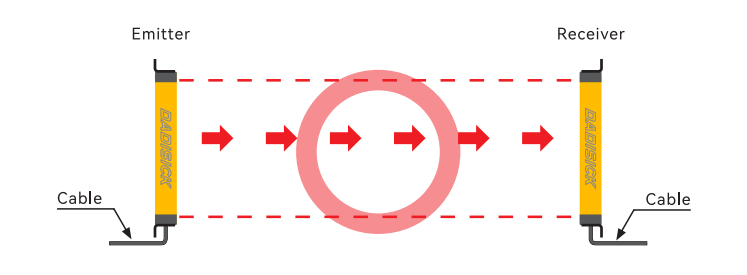
Install the transmitter and receiver
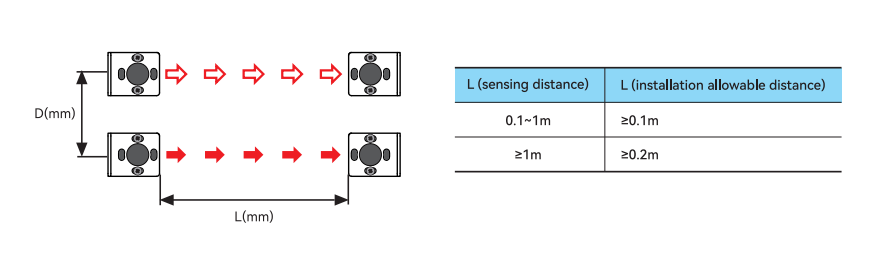
Mount the transmitter and receiver in the desired location. Make sure they are aligned accurately to ensure that the light beam can be stably transmitted from the transmitter to the receiver. The distance between the transmitter and the receiver should be consistent with the recommended distance in the product manual.
Adjust the height of the beam
Adjust the height and density of the beam according to the protection requirements. The height of the beam should cover all possible access to the hazardous area to avoid missed detection.
Fixed installation
Use brackets to fix the transmitter and receiver in the correct position. Make sure the installation is firm to avoid movement or vibration during operation, which will affect the effectiveness of the safety light curtain.
Before installation, please open the packing box first, check the packed components according to the packing list, and turn off the power supply of the machine tool at the beginning of installation to avoid danger.
Select Installation Method

Installation method of T-shaped screws on the back(Original accessories)

Installation method of the side right-angle bracket(Original accessories)

Installation method of convex nut(Optional accessories)

Installation method of right angle bracketsat both ends(Order separately)

Shockproof installation method of right-angle brackets at both ends(Order separately)

Stainless steel bracket installation(Order separately)
Installation direction
The installation direction of the light-emitting device and the light-receiving device should be consistent.

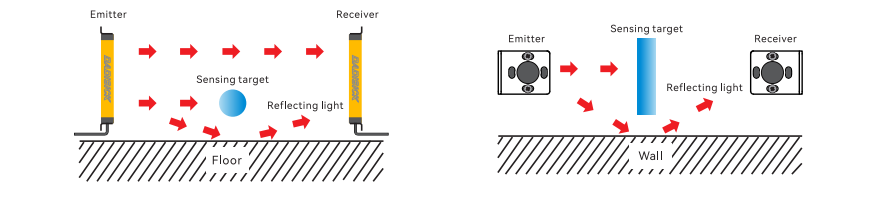
Reflection from the ground and walls
When installing it as below, the light reflected from the surface of the wall and the flat is not shaded. Please check whether it operates normally or not with a sensing target before using it.(interval distance: ≥ 0.5 m)
For the protection of interference
It may cause interference when installing more than 2 sets of the sensor. In order to avoid the interference of the sensor, please install as following figures and use the transmitted light frequency changing function.
· Transmission direction should be opposite between 2 sets
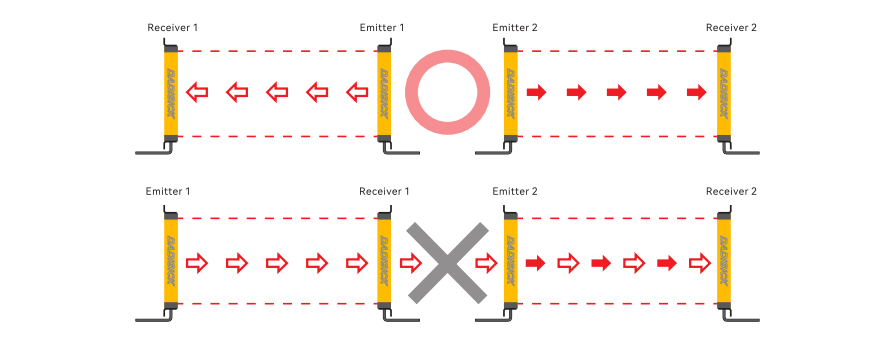
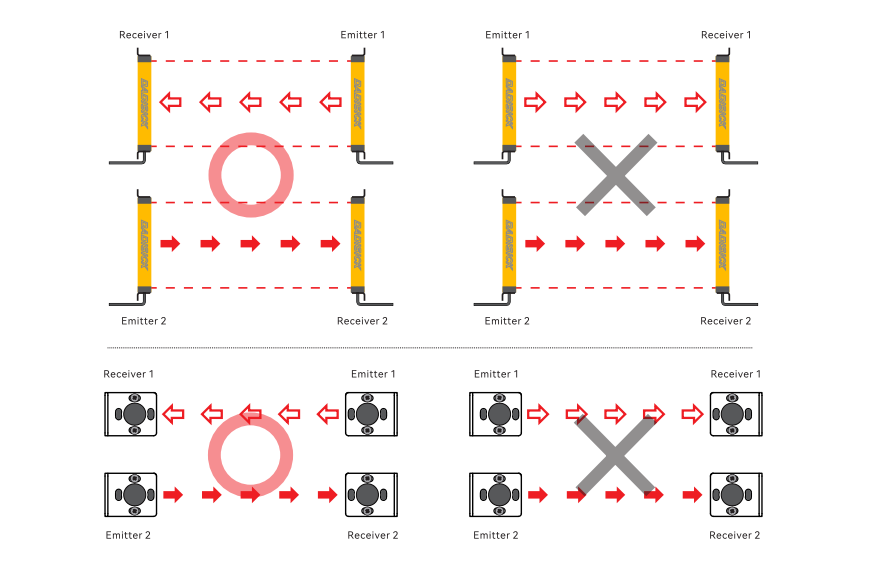
· A baffle should be installed between 2 sets.
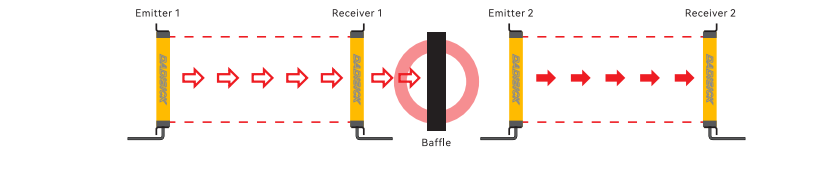
· Interval distance adjustment:
① Depending on the environment, it may vary.
② Do not use it directly under high-speed and high-frequency fluorescent lamps.
Safety light curtain installation precautions
Safety distance is one of the necessary conditions to ensure that the photoelectric protection device realizes the protection function. The safety distance must be calculated correctly, and the safety distance must be ensured during installation!
1. The determination of height position
The height position refers to the position of the light curtain of the photoelectric protection device relative to the upper and lower die ports of the machine tool, that is, under the premise of ensuring a safe distance, the lowest beam of light of the photoelectric protection device shall not be higher than the lower edge of the lower die mouth, and the top beam of light shall not be lower than the upper edge of the upper die port.
This involves the selection of the protection height of the photoelectric protection device. Protection height≥ machine slide stroke + adjustment amount

Correct installation location

Incorrect installation position(The light curtain is too close to the die port to stop in time)

Incorrect installation position
(The light curtain is too high, a human hand can reach under the light curtain)

Incorrect installation position
(The light curtain is low, a human hand can reach out from the top of the light curtain)
A. The height position is one of the necessary conditions to ensure that the photoelectric protection device realizes the protection function, and the height position must be ensured correctly during installation.B. If the mold is replaced during use, the safety distance and height position must be readjusted according to the above two requirements.
2. Setting of auxiliary protective measures
When the horizontal distance between the light curtain plane of the photoelectric protection device and the front end of the mold base exceeds 400mm, auxiliary photoelectric or protective fences should be installed to prevent the operator's body from entering the inside of the light curtain plane. When it is less than 400mm, safety measures such as auxiliary photoelectric or protective fence can also be taken.

Incorrect installation position(too far from the die port for people to enter the danger zone)
Connection and Configuration of Safety Light Curtains
Connect to the control system:
Connect the safety light curtain to the machine's control system so it can trigger a shutdown or other safety measures promptly when the light beam is blocked. Configure the required interfaces and communication protocols to meet the equipment's control requirements.
Parameter setting:
Set the relevant parameters of the safety light curtain through the control unit or software interface, such as detection sensitivity, beam coverage, response time, etc. Make sure the settings are consistent with the actual application scenario.
Testing and Debugging of Safety Light Curtains
Initial test:
Before formal use, perform an initial test on the safety light curtain. By blocking the light beam to simulate the situation where a person or object enters the protection area, check whether the safety light curtain can correctly trigger the equipment shutdown or other safety measures.
Daily Use and Maintenance of Safety Light Curtains
Daily inspection
Regularly check the alignment of the safety light curtain, the cleanliness of the light beam, and the stability of the connecting cables. Make sure that the transmitter and receiver are not blocked by dirt, dust, or other objects.
Regular testing
Repeat the function of the safety light curtain at regular intervals (such as weekly or monthly) to ensure that it can still work properly after long-term use.
Timely repair and replacement
If the safety light curtain is found to be faulty or damaged, it should be immediately decommissioned, repaired, or replaced. It should be tested again before use to confirm that it has returned to normal.
Precautions for Using Safety Light Curtains
Avoid misoperation
Do not place irrelevant objects in the protection area of the safety light curtain to avoid accidentally triggering the shutdown or alarm system.
Keep clean
Ensure that the surface of the transmitter and receiver is clean to avoid dust or oil from affecting the transmission of the light beam.
Train operators
Ensure that all operators understand the working principle and use of the safety light curtain and know how to deal with safety measures after the safety light curtain is triggered.
DADISICK's Hot Selling Safety Light Curtains

Beam spacing:40mm
Number of optical axes: 56
Protection height: 2200mm
Safety Curtain outputs (OSSD):2 PNP

Beam spacing: 80mm
Number of optical axes: 50
Protection height: 3920mm
Safety Curtain outputs (OSSD):2 PNP
Beam spacing: 40mm
Number of optical axes: 32
Protection height: 1240mm
Safety sensors for machines outputs (OSSD)2 PNP

Beam spacing: 10mm
Number of optical axes: 164
Protection height: 1630mm